pH management's important for hydroponics, aquariums, brewing, swimming pools, and beyond. This means measuring pH, and adding chemicals modify it until it's at a desired level. If you'd like to know more about pH for hydroponics, check out our article on the subject.
We live in an age of computers and automation, so you shouldn't have to do this by hand! Unfortunately, devices that do this automatically are expensive. For this project, we'll talk you through building one. We'll provide a simple, working design, using low cost, ready-to-use parts. After you get it up and running, we encourage you to improve it, or tweak it for your setup. We use use Raspberry Pi, and Arduino as examples in this guide. (Thanks to Richard Peche for suggesting the Raspberry Pi addition!) Check out our blog post on measuring pH with Raspberry Pi if you'd like more information.
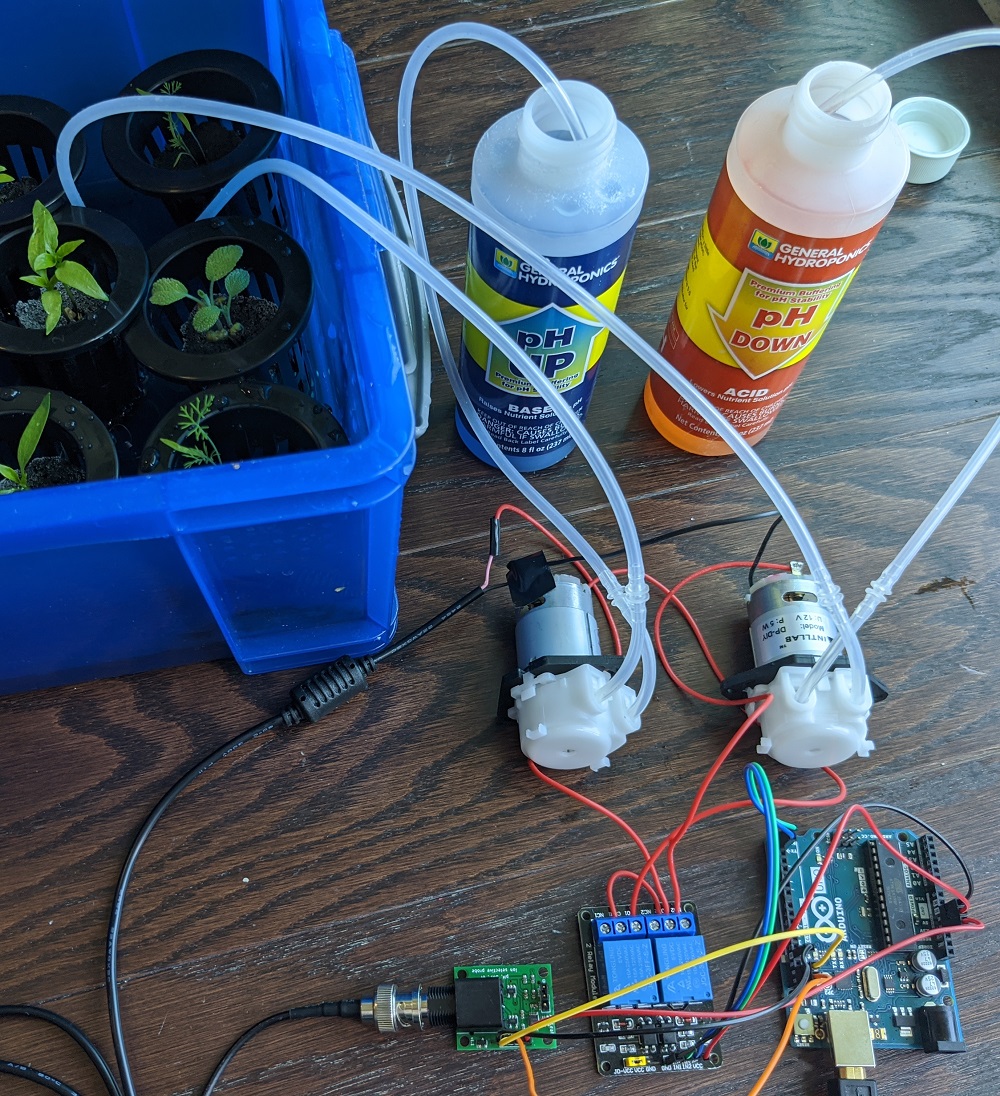
We can build this project using off-the-shelf components, with minimal soldering required. The complete setup:
Total: $125 (Less if you already have an Arduino/Pi or AC adapter)
This parts list provides a start, but there are many ways you can vary it if you'd like. For example, you could substitute in a different pH module, a different microcontroller, or something other than a mechanical relay. You might decide to use a breadboard to assist with wiring. If you have questions about if a change is appropriate, contact us to ask.
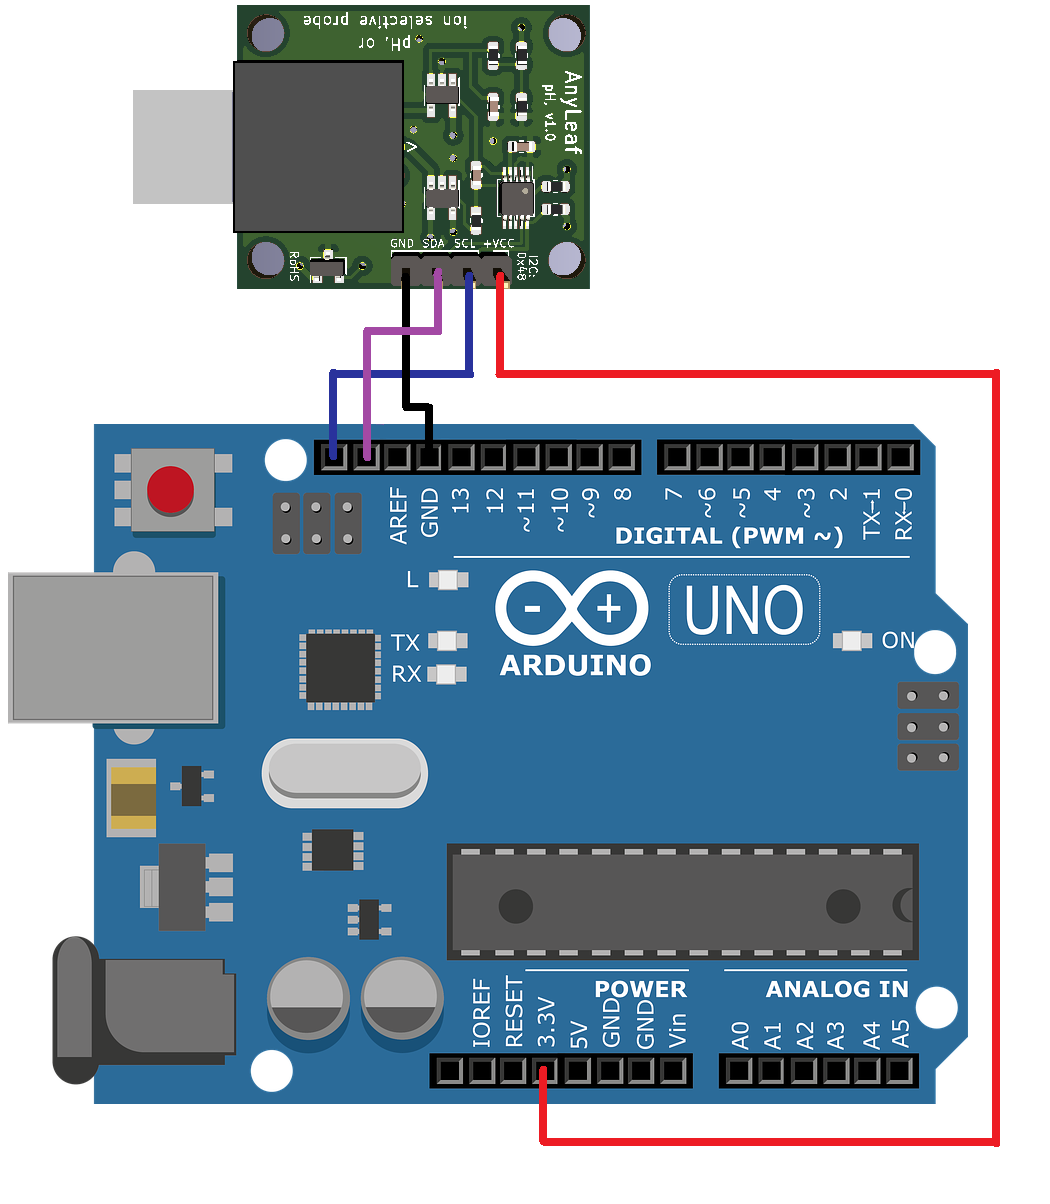
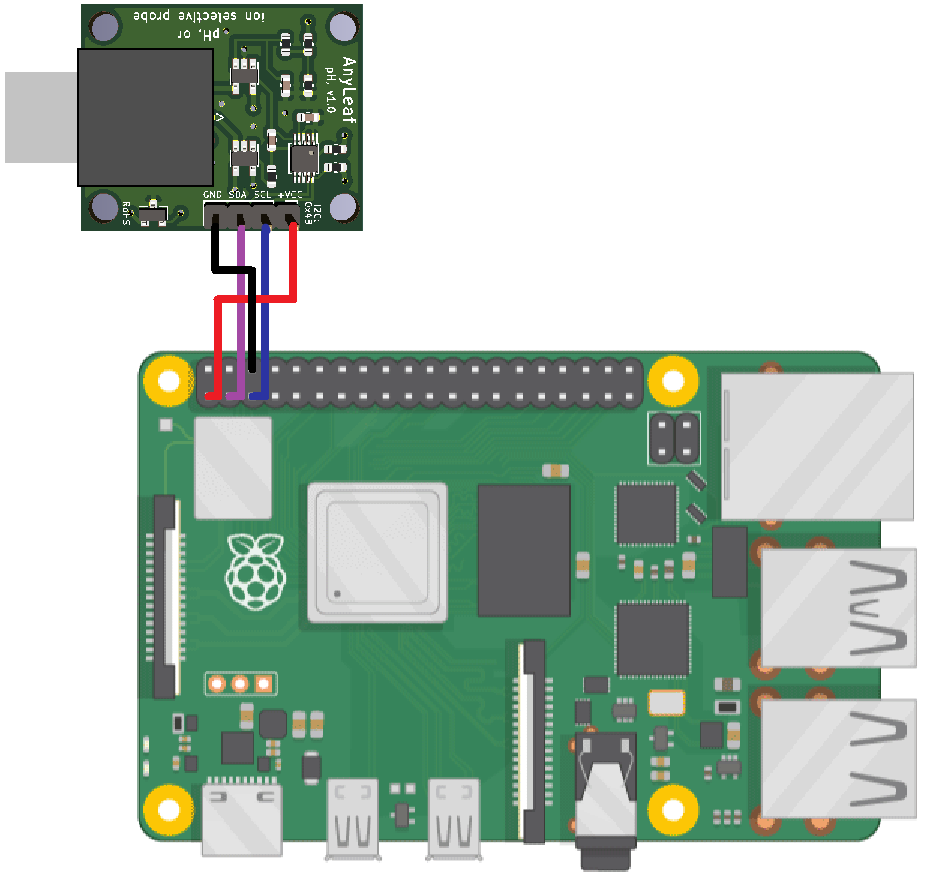
1: To start, connect the AnyLeaf pH module to your Pi or Arduino using jumper wires, with the following connections:
2: Connect the pH sensor to the module's BNC connector.
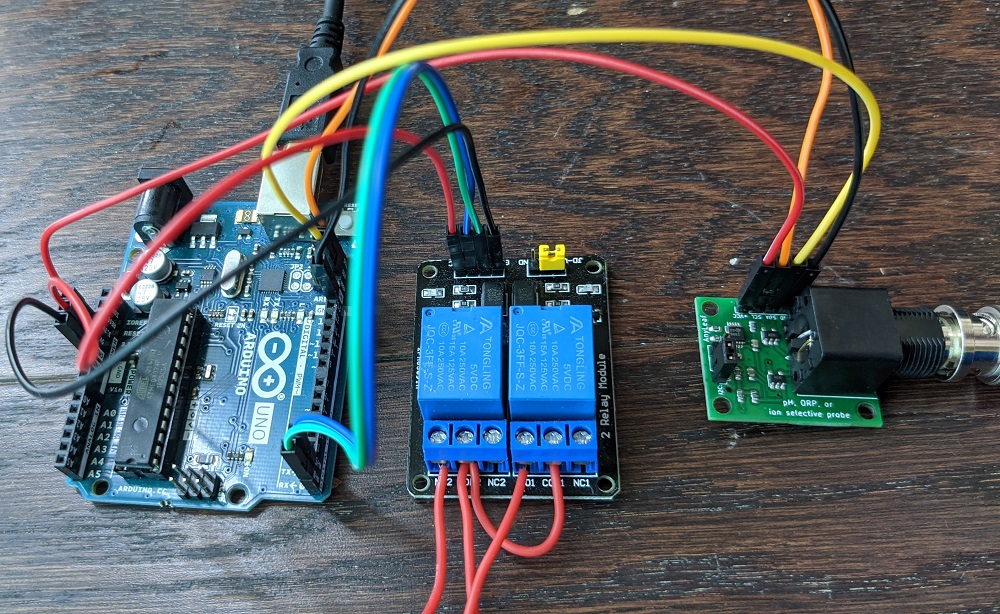
3: Connect the relay board to your Pi or Arduino using jumper wires, with the following connections:
4: Connect the tubing to the pumps. Place one tube lead from each pump in its associated dosing solution, and the other in the water you're dosing. You may need to experiment to determine which direction the pump works in. Pump direction can be reversed by reversing the pump's power wires. Take note of which pump you wish to be the one to increase pH, and which to decrease it - this will make setting up the code clearer.
The electronics:
You'll need to modify the AC Adapter before connecting it to the pumps and relays. ⚠️Warning: Do not modify the end that plugs into the wall!⚠️ Be careful not to touch any part of the wire while it's plugged in. The the 12V potential we'll be working with isn't the big threat: The big danger comes from the 120V or 240V AC that runs between the adapter and wall plug! You don't need to expose any 120/240V wires for this project. Don't touch these in general unless you know what you're doing, and exercise proper precautions.
Cut off the barrel jack on the DC output end of the AC adapter, while it's unplugged from the wall. You may wish to cut it off some distance from the end, since we can make use of the wire later.
Making the following connections between the relay module, 12V part of the adapter, and pumps:
Connect a short length of wire to each of the metal terminals on the pumps: 4 in total. As a technique, consider looping the wire through the terminal hole, and applying flux, then solder. This will give you a strong connection - both electrically and mechanically.
Connect the ground wire from the adapter (It will likely have black insulation) to the wire connected to the - of one pump. Then connect this to the - terminal of the other pump using a wire.
Unscrew 4 of the screws on the relay board: The ones labeled COM1, COM2, NO1, and NO2. COM stands for Common, and NO stands for Normally Open. With this setup, unless the relay board is powered, and a signal is applied to the appropriate IN pin, the pumps will be off. You could use the NC pins instead if you wanted the default state to be on. Some relays using a visual diagram of the connections instead of these labels. If this is the case, treat the middle connection as COM, and the one depicting an open polygon as NO.
Connect the power wire (Probably red insulation) of the adapter to one of the COM connections, and connect a small wire (eg from the part of the cord you cut - not a jumper wire) between the 2 COM ports.
Connect the + wire from one of the pumps to one of the NO connections on the relay. Do the same for the other pump and NO.
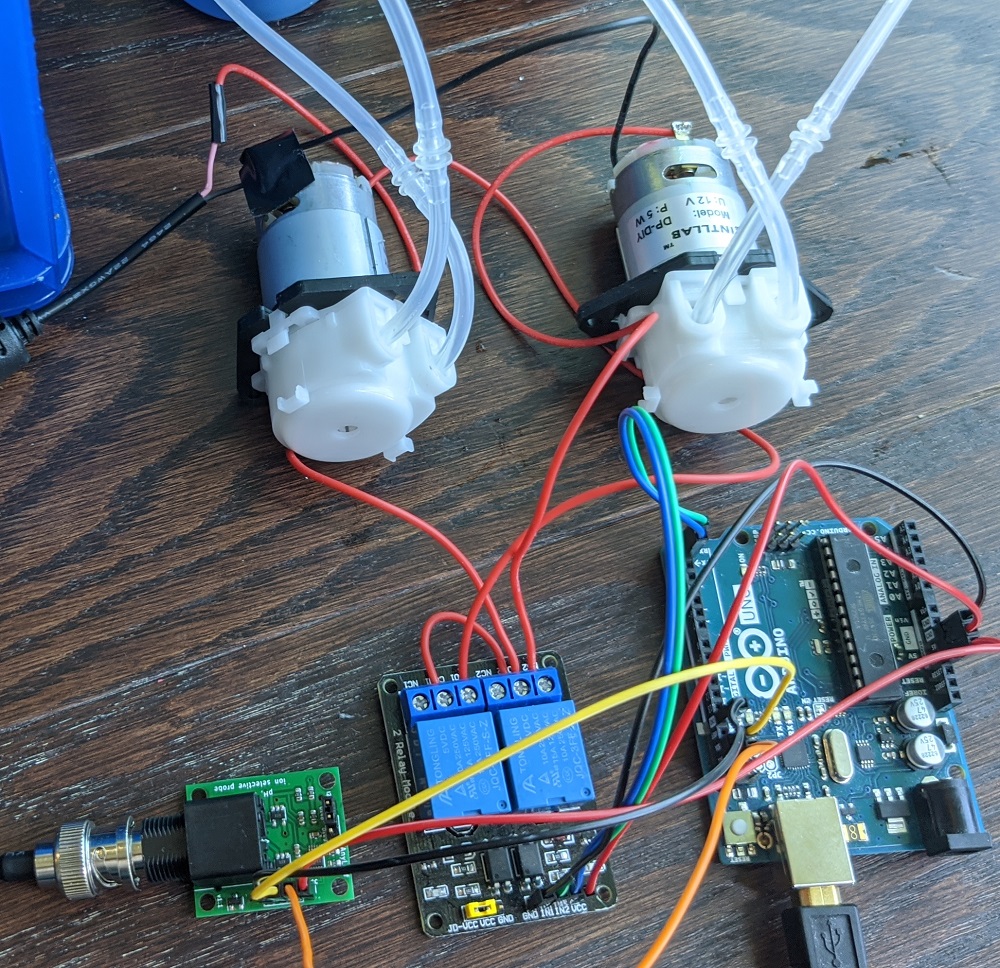
The electronics connected to the pumps:
Everything's now wired up! On to the software.
Here are some ways you could modify this setup:
If you use different pumps, make sure the AC adapter you choose is the right voltage for them. Note that you could also use the Water Monitor connected to a Raspberry Pi for pH readings.
The code examples here (Arduino, and Raspberry Pi Python) are simple and straightforward. If you're using a different pH module, make sure to follow its instructions for reading pH. If you're using a different controller and need help with the code, please contact us.
#include <Anyleaf.h>

PhSensor phSensor;

const float phDesired = 6.5;
const float phThresh = 0.3; // Stop adjusting when within this of `pHDesired`.
const float adjustVol = 1.; // mL
const float mlToMs = 1.; // Calibrate to find this.
const int waitBetweenAdjustments = 180 * 100UL; // ms
const int primeTime = 1000; // ms. Time to prime pumps
const int loopDelay = 1000; // ms. Time between main loop polling

void setup(void) {
    Serial.begin(9600);
    pinMode(1, OUTPUT);  // sets the digital pin 1 as output
    pinMode(2, OUTPUT); // sets the digital pin 1 as output

    // Make sure you calibrate according to your sensor's guidelines.
    phSensor = PhSensor();
}

// Populate this function to calibrate dose volumes: It's easier
// to work in volume than in time.
float calibrate_volume(int volMl) {
    return 1.; // placeholder
}

void addVolume(int pump, float volMl) {
    float timeMs = mlToMs * volMl;

    digitalWrite(pump, HIGH);
    delay(timeMs);
    digitalWrite(pump, LOW);
}

void addPhModifier(int pump) {
    addVolume(pump, adjustVol);
}

// Run this function while the pumps' inputs are connected to the
// pH up and down solutions, and output is plugged into a drain.
void primePumps() {
    digitalWrite(1, HIGH);  // Turn on pump 1
    digitalWrite(2, HIGH);  // Turn on pump 2.
    delay(primeTime);
    digitalWrite(1, LOW);  // Turn off pump 1.
    digitalWrite(2, LOW);  // Turn off pump 2.
}

void loop(void) {
    float ph = phSensor.read();

    if ((ph - phDesired) > phThresh) {
        addPhModifier(1);
        delay(waitBetweenAdjustments);
    } else if ((ph - phDesired) < -phThresh) {
        addPhModifier(2);
        delay(waitBetweenAdjustments);
    }

    delay(loopDelay);
}
import time
import board
import busio
from gpiozero import OutputDevice
from anyleaf import PhSensor, CalPt, OnBoard

PH_DESIRED = 6.5
PH_THRESH = 0.3  # Stop adjusting when within this of `PH_DESIRED`.
ADJUST_VOL = 1.0  # mL
ML_TO_S = 1.0  # Calibrate to find this.
WAIT_BETWEEN_ADJUSTMENTS = 180  # seconds
PRIME_TIME = 1  # s. Time to prime pumps
LOOP_DELAY = 1  # s. Time between main loop polling


def calibrate_volume(vol_ml: float):
    """
    Populate this function to calibrate dose volumes: It's easier
    to work in volume than in time.
    """
    pass  # placeholder


def add_volume(pump: OutputDevice, vol_ml: float):
    time = ML_TO_S * vol_ml

    pump.on()
    time.sleep(time)
    pump.off()


def add_ph_modifier(pump: OutputDevice):
    add_volume(pump, ADJUST_VOL)


def prime_pumps(pump1: OutputDevice, pump2: OutputDevice):
    """
    Run this function while the pumps' inputs are connected to the
    pH up and down solutions, and output is plugged into a drain.
    """
    pump1.on()  # Turn on pump 1
    pump2.on()  # Turn on pump 2.
    time.sleep(PRIME_TIME)
    pump1.off()  # Turn off pump 1.
    pump2.off()  # Turn off pump 2.


def main():
    i2c = busio.I2C(board.SCL, board.SDA)
    ph_sensor = PhSensor(i2c, LOOP_DELAY)

    # Calibrate as required.
    ph_sensor.calibrate_all(CalPt(0.0, 7.0, 25.0), CalPt(0.18, 4.0, 25.0))

    # Set the first arguments (GPIO pin number) to whicher pins you have the pumps connected to.
    pump_decrease = OutputDevice(17, active_high=False, initial_value=False)
    pump_increase = OutputDevice(27, active_high=False, initial_value=False)

    while True:
        ph = ph_sensor.read(OnBoard())

        if (ph - PH_DESIRED) > PH_THRESH:
            add_ph_modifier(pump_decrease)
            time.sleep(WAIT_BETWEEN_ADJUSTMENTS)
        elif (ph - PH_DESIRED) < -PH_THRESH:
            add_ph_modifier(pump_increase)
            time.sleep(WAIT_BETWEEN_ADJUSTMENTS)

        time.sleep(LOOP_DELAY)


if __name__ == "__main__":
    main()
Make sure you test your code in a system without plants first - you don't want to hurt them by accidentally adding too much modifier. Once you're confident the code works, move to your real system. Adjust parameters, like the acceptable pH threshold, time between adjustments, and amount of modifier to add each adjustment - these may vary with your system. For example, a bigger reservoir may require more modifier than a smaller one.
The software approach we took is simple and naive. See if you can make it more sophisticated. For example, we've been using operating time to control doses - this works, but is indirect. Create a function that will apply a specific volume of pH modifier, or change pH a specific amount. You'll need to experiment, and the latter will be specific to your system.
You can see a few unused skeleton functions you may populate and use. For example, prime_pumps is used to fill the pump's lines with adjuster fluid, so that measurements after are consistent. Consider using this before starting the dose process.
Consider adding code to handle an error from the pH reading. For example, what if you accidentally disconnect the probe? You might get bogus readings - we don't want that to trigger a dose! Perhaps you should keep track of how much modifier you've added (In time, or volume, if you've built that in), and set a limit on the amount that can be added in a single hour, day, etc.
If your reservoir temperature changes regularly, you may need to measure temperature, and use this to compensate your measured pH. With the AnyLeaf module, you can pass temperature into the measurement and calibration functions. If the temperature doesn't vary much, or you adjust at the same temperature as calibration, you don't need to worry about this.
You want to make sure the code only adds as much modifier as you need. Here are some guidelines:
Make adjustment as small as possible, and wait a while between adjusting and measuring. This way, the system pH has time to stabilize. As a general rule, larger reservoirs need more time between measurements. Circulating the solution reduces time required. Smaller reservoirs need smaller adjustments. If you don't wait long enough, or the adjustment are too long, you risk over-correcting, and getting into oscillations.
Set a sufficiently large range of acceptable pH. You could do that with something like the ph_thresh variable in the above example, or by setting upper and lower limits. The range you use will depend on your plants; one example is 5.8 to 6.3. In some systems, pH consistently drifts in a certain direction. If this is the case, you may wish to limit your adjustment to the opposite of that. If pH consistently drifts up, you might start adjusting whenever pH exceeds your upper limit, limit adjustment to down only, and continue adjusting until it hits your lower limit. Thanks to Reddit user bobrossofgrowing for this suggestion!
Keep track of which direction you're adjusting in. For example, if pH is too low when you start adjusting, don't let your code raise pH unless you're sure you've over-corrected. Consider stopping the process once pH drops below the target, or switching to a fine-adjustment mode that will make one final, small adjustment to hit your target.
How might you modify this project to work as an automatic waterer for hydroponics, or plants in soil?